Custom Install
How to install a Dynaudio in-ceiling speaker
575 views
0:32 - Measuring and finding studs
2:39 - Cutting the drywall
4:17 - Installing the tool-free frame
5:04 - Installing the speaker
6:24 - Final adjustments and installing the grille
Learn more at https://www.dynaudio.com/custom-install/
Find a Dynaudio dealer http://www.dynaudio.com/find-dealer/
Follow Us
► YouTube https://www.youtube.com/user/DynaudioCustomInstall
► Facebook https://www.facebook.com/DynaudioGroup
► Twitter https://twitter.com/dynaudio
► Instagram https://instagram.com/dynaudio/
► LinkedIn https://www.linkedin.com/company/dynaudio-as
View transcript
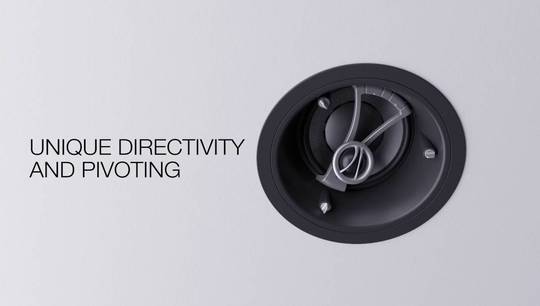
Hi and welcome to Dynaudio Custom Install. Today I'm here with Nick from Boca Theater and Automation to show you just how quick and easy it is to get started and finished. So, Nick, I thought you would be bringing a ton of tools, but where are they? That's the nice part of Dynaudio Speakers. We're gonna just use a couple of basic tools to get us through the construction period. And then, after that, we'll be putting the speaker into the ceiling. It's all tool-less. I love it. Alright! Well let's get started. One of the first things that I’d like to do after I've arrived at a customer's home and I'm about to install a Dynaudio Custom Installation speaker, after I've covered the ground my surrounding, maybe put some plastic over their personal belongings, I need to find where the studs are in the ceiling. So, I might take this magnet and if I run it along the ceiling, the drywall here, I'll be able to have the magnet stick to the ceiling, where there might be a screw head. I'm gonna go ahead and mark that with a piece of tape. And I keep along the same plane, same line and I find another screw head and mark that again with a piece of tape. Now, when I tap along there I might find that it's open or hollow. And, If I listen careful, it gets tighter at the truss. So now, I know that I don't want to put my speaker too close to this. This is a piece of wood. We're gonna stay away from that as best as possible. So now, If I take my measuring tape out, I'll measure my space that I have available to me. And I find that I have 36 inches. Half of that would be 18. So 18 is gonna be my center where my speaker is. So my Dynaudio speaker is 10 inches in diameter, 10¼ to be specific. So, If I find from the center point. I measure 5.8 inches from one way, 5.8 inches to the other direction. I'll find just about where the speaker should sit in the center. I take my speaker template and I grab that here. I line that up in between my two hash marks. And now I know exactly where my speaker's gonna go in the center of my map. With my pencil, just trace, lightly trace a line around my template. I don't want to leave too dark of a mark on the customer's ceiling. Now, I know what part of the drywall that I want to remove. I still might not be sure what’s in the ceiling. One of the tricks that I use, I like to use my awl. and I'll just poke that through the center of the ceiling like this And If I take just a small piece of wire, maybe I might be able to bend that. That 5.8 inches that I was talking about before. I'll put that straight into the hole. And I can get that to spin around through the drywall. I might be able to feel that I'm actually touching a truss. In that case, I might want to move my speaker over to the left or the right, further back or whatnot. I may have also another guy who might have been in the attic and see what the attic looks like or find where the trusses will be for me before I did my installation. Now I'm safe. I'm secure. I know that there is... ...no truss or no wood, nothing possible that I might get in the way of the speaker when I go to try and put it up. Now that I've made my preparation, I've measured, measured. I'm ready to cut. I'm gonna go ahead and grab the box that the speaker came out of and I can use that to catch some of the dust. Sometimes, I might want to have one of my other coworkers with me and we'll hold a vacuum close to the hole so we don't spread dust all over the customer's home. If I grab the box, I'll just begin here on one of the edges and start cutting. I just took care of the dusty, dirty part. Now I may have had a wire that they ran for us while they were doing the attic work. I'll take that down. So now, I've got my speaker wire ready. I'm just gonna put the Dynaudio basket, the frame, into the hole that I've cut with the drywall. I want to cinch down on these yellow tabs. They're friction based. So even if I wanted to move the speaker I could use the tab on the back, I'll show you, and bring those up again. Let's pull those down. They're tight with friction. And my frame is sure to stay in the ceiling. Now that I have my speaker ready to go and the frame securely into the ceiling, I want to make sure that I position this speaker has a bevel. And it's angled so that I can direct the sound into the room any which way I want. If I want to send it towards the couch, I can shoot it towards the sweet spot And create the atmosphere that I'm looking for. So If I just connect my speaker up here... Put that through there... Connect my speaker there... I can position the speaker to send the sound in any direction that I wish. I'm listened for that three snaps to have it click into the ceiling. (Snap 1) (Snap 2) (Snap 3) Then, I can turn my tweeter and give the high frequencies a little bit more a direction. And, we have a Dynaudio speaker in the ceiling. Well, the Dynaudio Custom Installation Speakers sound great out of the box. They do have two little tricks I'd like to show you. First of all, is this little button here. This is gonna brighten up the tweeter just in itself. We could lower the tweeter just a bit if we wish or we could make it just a little brighter. Second, I'd like to maybe position the tweeter. Here I have the tweeter swivel just in... I feel, three positions. So, We can direct the tweeter and hit the listener in the sweet spot. Right in the coach. I know I made light of the Dynaudio Custom Installation Speakers and how they have an angle bevel to them. What I want to do though is I might like to have the sound facing more towards towards the sofa and incorporate the whole living room space. So what I can do while I have the tweeter just the way I want it to, I can unlock the speaker once again and just turn the speaker in the circular frame and give that angle a little bit more direction as to where the audio is gonna go. Make sure I lock that once again and just gently push up. And I got my Dynaudio speaker to stay in the ceiling. No tools! You might find that they may have put the speaker up first before they painted the ceiling, but Dynaudio's included in the box, this nice paint mask. It's made of sturdy plastic. If I just lay that over top the speaker. Sometime I might use a piece of tape and make sure that stays right there where I put it. In this instance, we have the speaker right where we want it. And we're gonna use the magnetic speaker grill, to mount up. It sits flushed. They come in white. So that It's a fresh start. You could put and paint this to the colour of the ceiling in the client's home or any patterns that they may have on the ceiling. And you're ready to enjoy your Dynaudio speaker.