Hi, and welcome to Dynaudio Custom Install.
Today, I'm here with Nick from
Boca Theater & Automation
to show you just how quick and easy
it is to get started and finished.
So Nick, I thought you would be bringing
a ton of tools, but where are they?
That's the nice part
about Dynaudio speakers.
We're going to just use
a couple of basic tools
to get us through the
construction period.
And then after that,
it's all tool-less.
I love it. All right.
Well, let's get started.
With the Dynaudio Custom
Installation In-Wall Speakers,
I want to first find the stud.
So, I'm going to look on the wall
and maybe I might find the stud.
Oh! I have a magnet,
it sticks here on the wall.
I know that that's going
to be my screw-head,
so I'll mark that with
a piece of tape...
If I continue on the same plane,
move a little bit further,
I found another screw-head,
and I'll mark that with a piece of tape.
Now again, I have a visual representation
of how much space I have
and where my studs in the wall might land.
So, I'm going to take that
and find my measuring tape
and see my available space.
I have 24 inches.
Now, I know that's going to
be the center of the stud,
maybe I might want to move a little
bit more into the open wall cavity.
I'll make a mark here at 20 inches.
So this will be the
side of my in-wall speaker.
I take my template...
and I can line that up here
against my mark.
I'll get my level out and make
sure that my template is level.
Now that I have my template square,
I can trace around the outside,
and now I know on the wall where
I want to put my speaker.
One of the things that I like to do
when I'm installing an in-wall speaker
in a client's home, I'll just fold up
a real simple piece of paper like this,
and I can tape that underneath
my template where I'm going to cut.
This will catch any of
the drywall dust as it falls down
and keep it less clutter,
less mess in the customer's home.
I'll just start in the corner and
go ahead and start cutting.
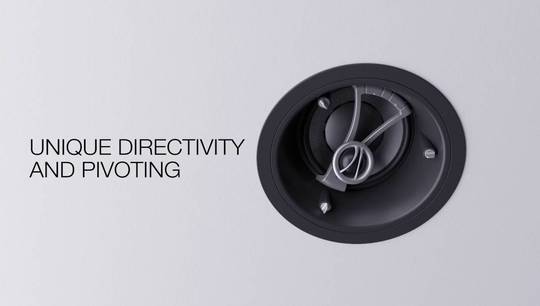
Now that we have our
hole in the wall for our speaker,
this in-wall speaker comes with six
friction tabs you'll see around the frame.
So I'll go ahead and
put my speaker wire through there,
through the basket,
and I'll simply use
the friction tabs on the back.
If I want to adjust them,
make sure it's level,
I can just simply push down back
on the tab and pull this back.
So, they're easy to adjust.
Cinch that down there.
It's almost one hand operation.
I want to go ahead and check,
make sure that I'm level.
In this case, I'm not.
So I'll simply loosen these tabs up
just a bit and then I can readjust that.
There, I'm level.
I'll go ahead and pull those down again.
They're in with friction and
I'm sure that I'm secure in the wall.
Go ahead and
match up our post.
Just push down on the tab,
and make sure our polarity is correct,
and I'm ready to
put the speaker into its home.
Again, I want to make sure I have my
tabs on the lock and I have that.
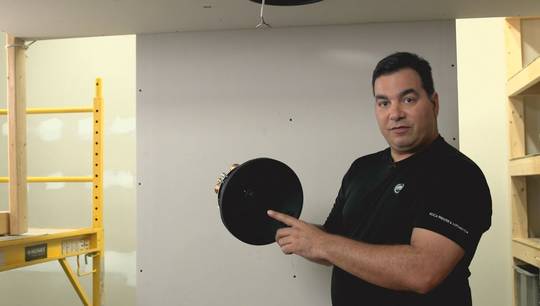
When I push just softly, I'll hear a click.
That speaker's in the wall
ready for a grille.
Some might enjoy a little bit
more brightness from the tweeter,
so we could use this switch here.
We can increase the sound from the tweeter,
the brightness,
or we could use the tweeter switch to
just decrease some of the brightness.
Now we're ready for the
magnetic speaker grille.
We'll just go ahead
and put this over our corners.
You'll see that
this fits flush to the wall.
The nice thing about this speaker grille
is that it comes in white,
so it can be custom painted
to match our clients wall
and any patterns that
they might want to put on there.
And you're ready to enjoy
your Dynaudio speaker.